your daily cup of tea™

powered by

Bash is glue, bash is tape, bash is my friend

For the last five years I have been using bash more and more. Whilst most ninja-black-ops-rockstars-part-time-pro-surfers moved into writing cool shit in rust or go, I found out most of my day to day problems with technology could be solved with just bash, probably to the detriment of my hireability. Well, I guess it really sucks that my problems are the equivalent of fixing stuff at home and the reason why you do not need a CNC machine for most household mainteinance operations.

My toolbox has a random selection of things I have accumulated over the years; my favourite tool at the moment is a staple gun. “Bash is my staple-gun, bash is my teflon tape and my zip tie” did not have the same ring to it though. Arguably using glue sucks and taping things is not the most elegant way of solving problems, and yet we have all seen cars that are kept together for years with just duc[kt] tape.

What I want to express forward is that it is possible to write useful scripts in bash. If I was a better writer I would try to convince you that these scripts can also be elegant. But I will pass on that for now, since words would fail me. I am no writer but a grunt.

Going back to the original point: why is bash glue, tape, or my friend?

Ken Thompson and Dennis Ritchie, key proponents of the Unix philosophy

I live in this little world of command line tools that I use every day. These tools receive arguments, flags, stdin, do some useful thing and exit with a code (0 meaning all was good, anything else is an error). Most times these also stdout and stderr things too. This is my system, there are other systems, but I like this one. Call it the UNIX way. The beauty of it all was eloquently described in 1999 by Neal Stephenson’s essay In the Beginning… Was the Command Line that can be read online.

Most of the time as a grunt I find that the real work has already been done by people more clever than me. Ah, but the interface. That’s my issue. When a task is simple enough that you do not need anything else, some piping is all you need. But other times you need to sprinkle a bit more magic to it. And here is when bash comes into play.

I use bash to glue together all these clever pieces of code that output exit codes, and as long as these parts do their thing I can move on to doing other stuff. What I find is that bash is unparalleled for that task. And that’s because bash is the shell itself and bash is ubiquitous. With bash I can construct better interfaces to build my own tools.

Sadly I think this puts me way in the middle of the bell curve, but who cares.

The other day I wrote a little snippet to quickly open remote-viewer (SPICE) on VMs that roam on a proxmox instance. The proxmox interface allows you to click through submenus and download a config file to be opened with remote-viewer. That works, but is not the interface I want. Here is my snippet

remote-viewer <(
    curl "https://$HOST:8006/api2/spiceconfig/nodes/$NODE/qemu/$VMID/spiceproxy" \
         -H "Authorization: PVEAPIToken=$TOKEN" \
         -d "proxy=$HOST" \
         -f -s -S -k
)

And I could have left it there. But instead I wrote px. Because I wanted a better way of declaring these variables, and possibly to continue exploring the proxmox api at my will.

This is not the only tool I have written using bash. While working at Kong, together with kidd, we wrote a nice tool called gojira. This time it was not SPICE configs and proxmoxes, but declaring a better interface for docker [compose]. I recommend reading this very useful Shell Field Guide that kidd wrote, based on the experiences we had writing gojira.

  * .    .   *   ___   .    +    .
 .     .   +    /  /  \   .   .
  + .          / /| - - |         *
       *   .   * | - - - |   *   .
   +     .      |---------|   .  +
               _|(O\_ _/O)
             _|/  (__''__)
           _|\/    WVVVVW    ゴジラ!
          \ _\     \MMMM/_
        _|\_\     _ '---; \_
   /\   \ _\/      \_   /   \
  / (    _\/     \   \  |'VVV
 (  '-,._\_.(      'VVV /
  \         /   _) /   _)
   '....--''\__vvv)\__vvv)      ldb

At another time, tired of blindly punching ANSI escape codes by hand I made vtmft and wrote a post about it.

The gist of it was, not only a better interface for a tool but a better interface for ANSI escape codes itself!

Related to this, I golfed a bit over a minimal progress bar solution and made a self documenting bash tool called barsh. And again, wrote a post about it.

Once I was angry at the complex interface of most tools that manage git hook scripts, and wrote hooka. This time I broke my ethos and wrote a full fledged tool instead of relying on the intelligence of others. The fact that I am not using it much tells me it was an error, but I had fun writing it. Look at this crazy linting function I put together.

Not content with my little toys, I again wrote a snippet to center ascii art here. Although this would be one of the examples where you do not need bash but just clever piping.

Finally

Trying to go for my grunt magnus opus, I have written this example scaffolding script for reaching out every other time I want to start a tool.

#!/usr/bin/env bash

# Some logging functions I like to having around

function inf  { >&2 printf "\033[34m[+]\033[0m %b\n" "$@" ; }
function warn { >&2 printf "\033[33m[!]\033[0m %b\n" "$@" ; }
function err  { >&2 printf "\033[31m[!]\033[0m %b\n" "$@" ; }
function err! { err "$@" && exit 1; }

# Tool name, useful for not having to mess with naming early on and support
# consistency with aliases

EXAMPLE=$(basename $0)

# Anything that can be configured on your script should be also configurable
# through environment variables. Sometimes I use a prefix for outside envs
# and proxy them to whatever name inside the script

SOMETHING=${EXAMPLE_SOMETHING:-some-default}
SMTH_ELSE=${EXAMPLE_SMTH_ELSE:-another-default}

# Usage of the script. Single text and no clever tricks here. I have found that
# having some ascii art representing my script makes me happy.

function usage {
  cat << EOF

                              .     '     ,
                                _________
                             _ /_|_____|_\ _
                               '. \   / .'
                                 '.\ /.'
                                   '.'

                $EXAMPLE: an example single-line description

Usage: $EXAMPLE action [options...]

Options:
  -s, --something   set something to anything
  -e, --smth-else   set something else
  -V, --verbose     echo every command that gets executed
  -h, --help        display this help

Commands:
  help                      Show usage

  some-action               Do some action

  another-action <thing>    Another action, takes a thing argument

  yaa <foo> <bar> [...]     Yet another action, takes multiple args

                            Example:
                              $ $EXAMPLE yaa hello world what is up

  ls <foo>                  Foo action, takes an argument. Extra np args get
                            passed to whatever it's doing

                            Example:
                              $ $EXAMPLE ls foobar
                              $ $EXAMPLE ls foobar -- -al

EOF
}


# Parse arguments. I do not use getopts because I can't remember any tar flags
# Important to note that unparsed arguments get stored into ARGS and to stop
# parsing after --  , storing it into _NP_ARGS. Also accept passing arguments
# as stdin with -

function parse_args {
  _ARGS=()
  _NP_ARGS=()

  ! [[ $1 =~ ^- ]] && ACTION=$1 && shift
  while [[ $# -gt 0 ]]; do
    case "$1" in
      -V|--verbose)
        set -x
        ;;
      -h|--help)
        usage
        exit 0
        ;;
      -s|--something)
        SOMETHING=$2
        shift
        ;;
      -e|--smth-else)
        SMTH_ELSE=$2
        shift
        ;;
      -)
        _ARGS+=("$(cat "$2")")
        shift
        ;;
      --)
        shift
        _NP_ARGS+=("$@")
        break
        ;;
      *)
        _ARGS+=("$1")
        ;;
    esac
    shift
  done
}


# Maybe some function that does things
function something-more-complex {
  local foo=$1
  local bar=$2

  set -- "${@:3:$#}"
  inf "Foo: $foo" "Bar: $bar" "Stuff: $*"
}


function main {
    parse_args "$@"

    # re-set action arguments after parsing. Now we can access action arguments
    # in their $1, $2, ... order
    set -- "${_ARGS[@]}"

    warn "SOMETHING=$SOMETHING" "SMTH_ELSE=$SMTH_ELSE"

    case $ACTION in
        some-action)
          echo "Hello World"
          ;;
        another-action)
          [[ -z $1 ]] && err! "Please provide a thing"
          echo "Here is the thing: $1"
          ;;
        yaa)
          something-more-complex "$@"
          ;;
        ls)
          # Some example that uses _NP_ARGS
          inf "The first argument was: $1"
          inf "And this is the result of 'ls ${_NP_ARGS[@]}'"
          ls ${_NP_ARGS[@]}
          ;;
        help)
          usage
          ;;
        *)
          # Display help on unrecognized action but err exit code
          usage
          exit 1
          ;;
    esac
}


main "$@"

Thanks for reading. And thank you bash for being my glue, my tape and my friend.

Note to friends: being glue or tape is not the only thing that’s holding our friendship together. Although, now that I think about it, maybe it is.

You do not need [tool] for simple gitops (most times)

My starting title was “You do not need ansible for simple gitops”, but writing it I realized I was using ansible as a straw man and in reality what I just wanted to trash about was the general complexity of our professional delivery pipelines.

There’s a big gap between ssh-ing into remote servers and issuing commands by hand (considered bad) and having an [over]engineered pipeline that depends on a variety of random tooling (the eidetic perfection of a platonic ▲).

If your deploys are simple and can be done on an executable script and you are only managing a handful of servers, a bare git repo and some bash is all you will need.

Step 1: create a git user on a server.

You can call this server your git server, or your manager server, ozymandias, or whatever. Set up public and private keys accordingly so you do not need to write passwords every time.

Step 2: create a bare repo on which to push.

You decide how complex you want to make this. Maybe this repo will have its own codebase related to deploying. Or maybe this repo will just be a mirror of another repo that lives in github.

git init --bare mytool.git

Step 3: add an executable post-receive hook.

This script will be called every time you issue a push on this remote.

The following scaffolding script gives you $oldrev $newrev and $refname values that you can use if you want to deploy a particular version. Never trust deploy scripts that uses only master.

#!/usr/bin/env bash
# /path/to/mytool.git/hooks/post-receive

while read oldrev newrev refname
do

  echo "Deploying $newrev"
  /some/path/to/a/deploy/script
  echo "Done"

  # or maybe you need to deploy to other servers

  ssh -T someuser@someserver << EOF
    pushd /some/path/somewhere
      ./deploy $newref
    popd
  EOF

  ssh -T someuser@anotherserver << EOF
    pushd /some/path/somewhere
      ./deploy $newref
    popd
  EOF

done

Step 4: Write a deploy script

How does a simple deploy script look like? In general, it will look very similar to all the steps you manually punch every time you are deploying.

#!/usr/bin/env bash

ref=$1

# stop some services maybe
supervisorctl -c supervisord.conf stop all

# install something
pip install mytool@$ref --upgrade

# start some services again
supervisorctl -c supervisord.conf start all

pushd some/other/path
  ./run-a-bunch
  ./of-more-scripts

  # or maybe you have some docker stuff around
  docker compose pull
  docker compose restart

  # you get my point
popd

Step 5: Add your deploy server as a remote

git remote add ozymandias git@some-server:mytool.git

Step 6: Deploy any time you want by just pushing to that remote and rejoice.

# upgrade
git push ozymandias master

# downgrade
git push ozymandias master~1

What if?

What if your git server gets compromised and a bad actor issues deploys for you?

Too bad. If your git server gets compromised, you can assume all your systems are compromised too. Try to look at the bright side of it, now you have a bad actor issuing deploys for you, less work!

What if you want an auditable track of your deploys / multiple users with roles and permissions / productivity graphs?

Use something else, like jenkins. Or start investing time in a neverending rabbit hole of external services poorly attached together with duct tape and yaml.

What if my setup is more complex than this, my servers are not pets but cattle and flock, etc?

I would say then you are already knee-deep on the mud and already drowning in complexity. There’s nothing I can say that will help you escape your fate.

Turn all your microservices into little helm charts, use terraform to bring your infrastructure up and down, remote build your docker images, push everything into private registries, write ci actions where every step runs on a docker in docker containerized alpine inside an ubuntu-latest container, do a blue green deploy on your kubernetes clusters, write thousdands of yaml lines and put them into the next shiny tool we have decided will bring us one step closer to

the eidetic perfection of a platonic ▲.

wordpress + sqlite quick start with docker compose

Today I have been trying out the sqlite plugin for wordpress that will reach wp Core on a near future. I did found different instructions out there, but was looking for something I could spin up and down without having to either require an existing running instance, running manual steps or trust non official images, so I ended up writing a docker compose project reference to set the whole thing up. Note the following is for local play testing purposes only.

The repo includes a db.php file (copied from the plugin db.copy file), that gets filled up during the plugin activation. Instead of doing that, it is included and already filled in. WordPress also wants a wp-config.php file present to tell it it has been configured, and the configuration steps require a database connection. I also wanted to skip this step. I also went overboard and ended up running the wordpress alpine with php-fpm image instead of the stock image starting an apache server, so it also includes an fpm.conf file containing a s[ai]mple configuration to nginx alongside.

The following steps will roughly get you there:

$ git clone https://github.com/eskerda/wp-sqlite-docker-compose
$ cd wp-sqlite-docker-compose
$ git clone https://github.com/wordpress/sqlite-database-integration
$ docker compose up -d
$ open http://localhost:8080
$ docker compose logs -f

These are the contents of the docker compose file

version: '3.8'
services:
  wordpress:
    image: wordpress:6.1.1-fpm-alpine
    volumes:
      - wordpress:/var/www/html/
      - ./wp-config.php:/var/www/html/wp-config.php
      - ./db.php:/var/www/html/wp-content/db.php
      - ./sqlite-database-integration:/var/www/html/wp-content/plugins/sqlite-database-integration
      - ./wp-content:/var/www/html/wp-content
  nginx:
    image: nginx:1.7
    volumes:
      - ./fpm.conf:/etc/nginx/conf.d/default.conf
      - wordpress:/var/www/html
    ports:
      - 8080:80
volumes:
  wordpress:

It defines a volume to hold all the wordpress files so it survives restarts, and also includes a local bind mount to wp-content for easy playing with the sqlite db. Ideally I would like to bind mount this file directly, but I was getting permission errors and didn’t really want to deal with that pain at the moment.

$ sqlite3 wp-content/database/wordpress.db
SQLite version 3.37.0 2021-12-09 01:34:53
Enter ".help" for usage hints.
sqlite> .tables
wp_commentmeta         wp_postmeta            wp_termmeta
wp_comments            wp_posts               wp_terms
wp_links               wp_term_relationships  wp_usermeta
wp_options             wp_term_taxonomy       wp_users
sqlite> .schema wp_posts
CREATE TABLE wp_posts (
	ID  integer   NOT NULL  PRIMARY KEY AUTOINCREMENT ,
	post_author  integer   NOT NULL default '0',
	post_date   text NOT NULL default '0000-00-00 00:00:00',
	post_date_gmt   text NOT NULL default '0000-00-00 00:00:00',
	post_content  text NOT NULL,
	post_title  text NOT NULL,
	post_excerpt  text NOT NULL,
	post_status   text NOT NULL default 'publish',
	comment_status   text NOT NULL default 'open',
	ping_status   text NOT NULL default 'open',
	post_password   text NOT NULL default '',
	post_name   text NOT NULL default '',
	to_ping  text NOT NULL,
	pinged  text NOT NULL,
	post_modified   text NOT NULL default '0000-00-00 00:00:00',
	post_modified_gmt   text NOT NULL default '0000-00-00 00:00:00',
	post_content_filtered  text NOT NULL,
	post_parent  integer   NOT NULL default '0',
	guid   text NOT NULL default '',
	menu_order   integer NOT NULL default '0',
	post_type   text NOT NULL default 'post',
	post_mime_type   text NOT NULL default '',
	comment_count  integer NOT NULL default '0'
);
CREATE INDEX post_name ON wp_posts(post_name);
CREATE INDEX type_status_date ON wp_posts(post_type,post_status,post_date,ID);
CREATE INDEX post_parent ON wp_posts(post_parent);
CREATE INDEX post_author ON wp_posts(post_author);
sqlite>

Overall, this looks promising and will probably update this wordpress instance to something similar soon™.

As a final note, I wanted to just provide a quick docker oneliner without much of the fpm bind mount complexity I added along the way. The following just works as much:

docker run --name wp-sqlite -v $(realpath wp-config.php):/var/www/html/wp-config.php -v $(realpath db.php):/var/www/html/wp-content/db.php -v $(realpath sqlite-database-integration):/var/www/html/wp-content/plugins/sqlite-database-integration -p 8080:80 wordpress

Oceanic+ app on the Apple Watch Ultra and the perils of subscription based software

Apple’s newest watch, rated up to 100m comes with a depth sensor (usable up to 40m). This is just a small thing among the many features their Übermensch watch boasts, so its implications might have been eluded. The introduction of the Oceanic+ app has made recent news among both tech and diving circles, yet I feel the discussion is missing out on what to me is a turning point.

Apple is not selling a dive computer, it’s selling a platform to already established dive computer manufacturers, such as Oceanic. The question motivating this post is if the platform is going to be open to other manufacturers and individual developers.

Apple is behind the first general purpose programmable dive computer

I used to think (sweet summer child) that the first programmable dive computer was going to be under a community project. There are some, both software and hardware. The most notable are probably the OSTC dive computers from heinrichs weikamp, and not mentioning it here would be a disservice to them. Still, I would not call the OSTC a general purpose programmable dive computer.

Quick primer on dive computers

I would summarize a dive computer as follows: a device that regularly monitors your time and depth underwater and provide you with safety margins and operations (decompression stops). The reason behind these are lenghty and fall under the realm of the physics of diving, and out of the scope of this post.

All of the following are dive computers, under different tech generations, features and price ranges.

Cressi Leonardo
Suunto d6i
suunto d5
Scubapro SOS Deco meter, aka Bend-O-Matic
shearwater perdix 2 ti, aka you cannot outgrow this computer

All of them do roughly the same. That might come as an overstatement, but on 80% of recreational diving, all of these serve the same purpose: depth, time and a 3 minutes stop reminder. Maybe a compass? For the sake of this post, I will consciously ignore the remining 20%. You know who you are and what tool serves your purpose and your safety. This post is not about you.

Algorithms

A dive computer follows a decompression algorithm. There are many, and are documented mathematic models sprinkled with patented modifications. Bühlmann and RGB are the most common ones. I am mentioning algorithms just to highlight that there’s nothing inherently magical about a dive computer and the algorithm is an implementation detail. The companies behind dive computers are not only selling the watch, but the algorithm.

Why an expensive dive computer

We humans are capricious creatures. We like our tools as much as we like shiny things, and as such, sometimes we buy things that we do not really need for a variety of reasons. It’s none of my business how we humans decide to part with our money, but on the sport of recreational diving, it’s a well known fact that most recreational divers do not need an expensive dive computer. Still, we buy them. Because they are shiny, because they are top of the line. Because they are reliable and have a compass. Because they have a different algorithm or because we cannot outgrow them. And that’s fine! Now again, there’s something very important:

A dive computer that you do not understand is the same as having no computer at all

This much money will give you a very nice dive computer, albeit terribly complex and completely overkill for most of the recreational diving. If someone is willing to spend that much on a dive computer for recreational diving, is an apple watch money better spent?

expensive dive computer that gives you way too much information
a much simpler interface, for the same price

Let’s just acknowledge that a technical dive computer is a tough sell to someone that wants to spend this much but dives very very occasionally, with a dive guide and on shallow waters. I have seen the very confused face of a yacht owner diving with his shiny 1k USD new G2 Scubapro dive computer trying to understand what the numbers are telling him.

For someone that wants to spend this much on a vanity dive computer, a very expensive but simpler dive computer is a better choice. I know that’s what entry level dive computers are for, but think about someone looking for dive computer that is both expensive and simple to use. The market exists.

About target audience

I think the target audience still does not know they are the target audience, because they still do not need a dive computer! For all I know, the target audience still does not even know they want to dive yet.

If you already dive, and you own a dive computer, you are only a very small part of the target audience, and I think it will dwarf compared to the number of people that will get certified already owning an apple watch. Why buy a new dive computer, when the watch you are wearing is already ‘dive computer’ capable?

excuse my crude inkscape art

Subscription: a partnership between Apple and Oceanic

Apple is not a dive computer company. They sell computers. Other dive computer brands also sell computers, but these are not general purpose. Apple is now entering a different new field, it’s offering their platform to others to market their “dive computer experiences”. This is new for scuba diving. I guess it’s not so new on trekking and hiking. A suunto or a garmin might give you a better overall experience, but for most of the recreational hiking, an apple watch loaded with a maps app suffices.

Oh, but the margins… I guess the margins of selling software and hardware are not the same. And as such, Oceanic has decided to go the route of a subscription model. Maybe they are testing the waters? (heh).

By looking at the numbers, tissue loading and decompression info is only covered under a subscription. Even if 80% of recreational diving does not require this, if you are not covering for these, why do wear a dive computer at all? This subscription model makes me sad and I am worried about the implications of this when / if it proves successful.

Remember when I said the physics of diving were out of the scope of this post? Imagine if I told you, pay me 4.99 USD/day and I will tell you about the physics of diving.

The perils of proprietary subscriptions are many, see https://www.gnu.org/proprietary/proprietary-subscriptions.html for more information. A life safety device tied under a subscription that will refuse to provide vital information when the situation needs it raises many questions.

I feel sad knowing that new divers will enter the space with such a model already in place. We tend to forget about the things we have never experienced differently and as such, to someone new a subscription model on a dive watch might not raise the same alarms as it does to me.

It’s this strange gut feeling telling you that something wrong is happening, even though you cannot put it on proper words, and I am trying to do this by writing this post.

What can we do about it (if we care) – mostly questions or a summary

  • Is this a unique deal between Apple and Oceanic, or would they allow other stablished manufacturers to coexist on their platform, say Suunto.
  • Will other manufacturers follow suit, and publish their own diving app for the apple watch. Long term, will they try the subscription model too if they see that it works?
  • Related to the previous point, can the user of an apple watch choose freely which app they want to use for diving?
  • If so, is the community ready for providing a libre diving app for the apple watch? Will the apple store ever accept such an app? Does any apple watch app have unrestricted access to the pressure readings.
  • How long until other platforms start integrating depth sensors and serious depth ratings? The manufacturing technology is there. Once the manufacturing process of integrating these chips exists, any other company will start doing it. If so, will it be an android device?
  • How long until a community platform, such as https://www.pine64.org/pinetime/ starts integrating a depth sensor and is the community ready for such thing happening?
  • I feel that discussing the Oceanic+ on the apple watch hero just from the standpoint of a dive computer is missing the point. If I understand this correctly, Apple is selling their platform to already established brands. It’s telling them, stop building hardware and just build software on mine.
  • I also somehow feel we (as in, me and whoever else cares) have failed our future selfs by being late to this party. We have no platform, no software and the first example of such dive app being subscription based is setting a dangerous precendent to our already walled digital lives.

A docker compose command that brings up a service without a command

Here is a fun one I got whilst trying to justify why abusing docker compose accepting file inputs from stdin is a very powerful pattern

# Bring up services without a command
#
# usage:
# nocmd.sh up -d service_name

function _compose {
  docker-compose -f docker-compose.yml $@
}

function nocmd {
  cat << EOF
  services:
    $1:
      command: tail -f /dev/null
EOF
}

function nocmd_compose {
  local service=${@: -1}
  _compose -f <(nocmd "$service") $@
}

nocmd_compose $@

Log in and pull from a docker private registry with Rancher Desktop (macOS)

If you are struggling to get Rancher Desktop to pull docker images from a private container registry, this is what worked on my setup.

It turns out that Rancher Desktop on macOS uses Lima under the hood to start a linux VM and basically, you need to authenticate any docker private registry from within the linux VM.

First, you need to access the Lima VM. Rancher Desktop bundles its own lima binaries and paths, so you need to specify a LIMA_HOME env var. limactl binary is under Rancher’s resources too (or brew install lima and use that).

$ export LIMA_HOME="$HOME/Library/Application Support/rancher-desktop/lima"
$ /Applications/Rancher\ Desktop.app/Contents/Resources/resources/darwin/lima/bin/limactl shell 0
lima-rancher-desktop$ uname -a
Linux lima-rancher-desktop 5.15.32-0-virt #1-Alpine SMP Mon, 28 Mar 2022 13:09:00 +0000 aarch64 Linux

From inside the linux VM, it’s now possible to configure docker login credentials. I use a json key file from gcloud https://cloud.google.com/container-registry/docs/advanced-authentication#json-key

lima-rancher-desktop$ cat account.json | docker login -u _json_key --password-stdin https://gcr.io
WARNING! Your password will be stored unencrypted in /home/eskerda.linux/.docker/config.json.
Configure a credential helper to remove this warning. See
https://docs.docker.com/engine/reference/commandline/login/#credentials-store

Login Succeeded
lima-rancher-desktop$ nerdctl pull gcr.io/some-gcr-account-1234/private_image
...

If this level of indirection is confusing to you, I want you to know that you are not alone. I did hit this when trying to try out a local helm chart I wrote against something and used rancher as an easy way to get kubectl on macOS. Note to self: there’s no easy way, and it’s not possible to use tools you do not understand. The lack of documentation on this is surprising, and google search sending me here did not help at all. It might just be an impression, but I feel google search keeps getting worse and worse on these kind of queries.

On the positive side, I found out about lima-vm/Lima, which is pretty cool (when forced to use macOS, that is). The following pretty much sums it up

$ uname -a
Darwin trouble 21.5.0 Darwin Kernel Version 21.5.0: Tue Apr 26 21:08:37 PDT 2022; root:xnu-8020.121.3~4/RELEASE_ARM64_T6000 arm64
$ lima uname -a
Linux lima-default 5.15.0-39-generic #42-Ubuntu SMP Thu Jun 9 23:44:48 UTC 2022 aarch64 aarch64 aarch64 GNU/Linux

Centering ANSI images on a terminal

Nothing screams last decade like CSS centering. Nowadays it’s all about the terminal. Say you have this nice snorlax on a text file. It all looks nice, except it’s not centered.

It’s full of ANSI escape codes, so fmt won’t do it

We could clean it up

Get the length of the longest line

Get the width of the terminal, subtract the length and divide it by two

Finally use that magic number and pad your snorlax

Ah yes, a nice oneliner

you know.. let’s make it nice and readable

function center {
  local f p s
  f=$(mktemp);p=${1:-$(tput cols)};s="s,\x1B\[[0-9;]*[a-zA-Z],,g";cat>$f
  s=$(cat $f|sed $s|while IFS= read -r l;do echo ${#l};done|sort -n|tail -1)
  s=$(((p-s)/2));s=$(printf "%${s}s" " ");cat $f|sed -e 's/^/'"$s"'/';rm $f
}

things I like: vim-fugitive + vim-rhubarb + GBrowse

There are many things any git plugin for your editor will give you. For me, the most important feature I need to feel productive is any means of opening a particular file in github or any other hosted SCM. I have seen extended git[hub] metadata directly visible at the editor (looking at you vscode) but that feels too much in your face.

Like it or not, your work directory lives on this particular platform, so sooner or later you will have to interact with it. For vim, that’s exactly what :GBrowse is, provided by vim-fugitive and vim-rhubarb.

:GBrowse                Open the current file, blob, tree, commit, or tag
                        in your browser at the upstream hosting provider.
                        Upstream providers can be added by installing an
                        appropriate Vim plugin.  For example, GitHub can be
                        supported by installing rhubarb.vim, available at
                        <https://github.com/tpope/vim-rhubarb>.

:GBrowse {object}       Like :GBrowse, but for a given |fugitive-object|.

:{range}GBrowse [args]  Appends an anchor to the URL that emphasizes the
                        selected lines. This also forces the URL to include a
                        commit rather than a branch name so it remains valid
                        if the file changes.  You can give a range of "0" to
                        force this behavior without including an anchor.

:GBrowse [...]@{remote} Force using the given remote rather than the remote
                        for the current branch.  The remote is used to
                        determine which upstream repository to link to.

:GBrowse {url}          Open an arbitrary URL in your browser.

:[range]GBrowse! [args] Like :GBrowse, but put the URL on the clipboard rather
                        than opening it.

I have this on my .vimrc. I prefix some macros with , and a theme g[it]. These macros work both on normal, and visual mode for ranges.

map ,gg :GBrowse<cr>
map ,gb :Git blame<cr>

You won’t try it unless there’s some heavy rich and colorful animations flashing on your screen.

Open markdown files instead of messing with local rendering
view a file or a particular set of lines
View a file or a particular set of lines
flow through the history of time and space with git blame
Flow through the history of time and space with :Git blame

things I hate: daylight savings time

The time was right. Then suddenly it was not. Now it’s always one hour too late.

Not this time. I won’t change the time on my watch and I will try to remember to add one hour to anything that is not looking at the time and saying: this is fine.

We are a total utter failure for allowing our devices to silently change their clocks. I have a crap ton of notifications on my phone from things I couldn’t give less fucks about and yet somehow it manages to not tell me about this. We deserve it.

quick and friendly bash terminal colors

Just published vtfmt, a small bash utility to quickly colorize strings without either dragging in a huge library with too much features or having to manually put (and remember) ANSI escape codes. I have tried to keep it as minimal as possible and I am still surprised how far can just three lines go!

The implementation is pretty straightforward. An associative array with friendly names for the different ANSI color codes and a function that appends these as a mode between \033[ and m :)

#!/usr/bin/env bash

declare -A FMT_SET=(
  # Set
  [reset]=0
  [bold]=1
  [dim]=2
  [underline]=4
  [blink]=5
  [reverse]=7
  [hidden]=8
  # fg colors
  [fg:default]=39
  [fg:black]=30
  [fg:red]=31
  [fg:green]=32
  [fg:yellow]=33
  [fg:blue]=34
  [fg:magenta]=35
  [fg:cyan]=36
  [fg:light-gray]=37
  [fg:dark-gray]=90
  [fg:light-red]=91
  [fg:light-green]=92
  [fg:light-yellow]=93
  [fg:light-blue]=94
  [fg:light-magenta]=95
  [fg:light-cyan]=96
  [fg:white]=97
  # bg colors
  [bg:default]=49
  [bg:black]=40
  [bg:red]=41
  [bg:green]=42
  [bg:yellow]=43
  [bg:blue]=44
  [bg:magenta]=45
  [bg:cyan]=46
  [bg:light-gray]=47
  [bg:dark-gray]=100
  [bg:light-red]=101
  [bg:light-green]=102
  [bg:light-yellow]=103
  [bg:light-blue]=104
  [bg:light-magenta]=105
  [bg:light-cyan]=106
  [bg:white]=107
)

function vtfmt {
  local out=(); for comp in "$@"; do out+=("${FMT_SET[$comp]}"); done
  IFS=';' ; echo "\033[${out[*]}m"
}

# script is not sourced
if [[ ${#BASH_SOURCE[@]} -lt 2 ]]; then
  # has arguments
  if [[ $# -gt 0 ]]; then
    vtfmt "$@"
  else
    echo -en "$(vtfmt bg:light-magenta fg:black bold) vtfmt $(vtfmt reset) "
    echo -e "This utility is by no means $(vtfmt fg:green)feature $(vtfmt underline)complete.$(vtfmt reset) "
    echo -e "And yet it can do quite some things considering how $(vtfmt bold)small$(vtfmt normal) it is!"
    echo ""
    declare -f vtfmt
    echo ""

    # or basically anywhere to compose different color modes
    WARN_C="$(vtfmt bg:yellow fg:black) WARN $(vtfmt reverse) %s$(vtfmt reset)\n"
    INF_C="$(vtfmt bg:green fg:black) INFO $(vtfmt reverse) %s$(vtfmt reset)\n"
    ERR_C="$(vtfmt bg:red fg:black)  ERR $(vtfmt reverse) %s$(vtfmt reset)\n"

    function inf  { printf "$INF_C" "$*" ; }
    function err  { printf "$ERR_C" "$*" ; }
    function warn { printf "$WARN_C" "$*" ; }

    inf "some info"
    warn "you have been warned"
    err "such an error"
  fi
fi

complex docker-compose templates using bash (or anything you can execute)

A cool trick I have not seen applied much (maybe it’s a bad idea, and that’s why) is using bash as a templating language for complex compose yml files.

docker-compose is a nifty entry level tool to work with Docker, but it has its own caveats and limitations and is not really under active feature development. By using templates and exploiting file descriptors on the -f flag it’s possible to supercharge and extend docker-compose functionality.

To date, compose files only allow for variable substitution, and only for values. That works for simple straightforward setups, but a more complex environment might need its own runtime logic into it. This becomes useful particularly on development scenarios.

#!/usr/bin/env bash
# some.compose.yml.sh

answer() {
  echo 42
}

cat << EOF
services:
  app:
    image: scratch
    environment:
      ALL_THINGS_ANSWERED: $(answer)
EOF
$ ./some.compose.yml.sh
services:
  app:
    image: scratch
    environment:
      ALL_THINGS_ANSWERED: 42
$ docker compose -f <(./some.compose.yml.sh) -p foo config
services:
  app:
    environment:
      ALL_THINGS_ANSWERED: "42"
    image: scratch
    networks:
      default: null
networks:
  default:
    name: foo_default

This example used bash, but note that any executable producing a valid compose yml output will work!

#!/usr/bin/env python3
# some.py
def answer():
    return 42
print(f"""
services:
  app:
    image: scratch
    environment:
      ALL_THINGS_ANSWERED: {answer()}
""")
$ ./some.py
services:
  app:
    image: scratch
    environment:
      ALL_THINGS_ANSWERED: 42
$ docker compose -f <(./some.py) -p foo config
services:
  app:
    environment:
      ALL_THINGS_ANSWERED: "42"
    image: scratch
    networks:
      default: null
networks:
  default:
    name: foo_default

Hope this silly example makes sense. For a real world case of this pattern being applied, check out https://github.com/Kong/gojira/.

Kudos to Rai and Niji for their part on figuring out this pattern.

See also: A docker compose command that brings up a service without a command

abusing ANSI escape sequences for minimal progress bars

While diving on ANSI escape sequences, it occurred to me it would be fun to do a progress bar by using only the reverse video escape codes ESC[7m and ESC[27m.

Terminal progress bars as a fun coding exercise. There are countless libraries and helpers out there written in a myriad of languages and techniques. The usual and obvious solution is by using block elements like █ and ░, and more resolution can be achieved by using eighth blocks ▏▎▍…

$ echo 'print("█" * 10 + "░" * 5)' | python
██████████░░░░░

What if instead we use the inverted foreground color to draw the bar? That way it would make it very easy to include text on the progress bar.

$ printf "\033[7mLorem ipsum dolor \033[27msit amet\n"

There are downsides though. Escape codes are just rendered, so progress bars will not carry over uninterpreted plain text. Also, resolution is limited to a single block (compared to drawing eighth blocks):

for i in {0..20}; do
  printf "\033[7m%*s\033[27m%*s▏$i\n" $i "" $((20-i)) ""
done

Here’s a minimal bash implementation. It’s a bit unreadable, but that was the fun of playing golf with it. The amount of features per number of lines is pretty great.

function barsh {
  [[ $# -lt 2 ]] && return 1
  local val=$1; local bas=$2; local txt=$3; local wid=$4;

  [[ -z $wid ]] && { [[ -z $txt ]] && wid=$bas || wid=${#txt} ; }
  [[ -z $txt ]] && txt="$(printf '%*s' "$wid" '')"
  [[ $wid -gt ${#txt} ]] && txt=$txt$(printf '%*s' $((${#txt} - wid)) '')

  local per=$(( (wid * val) / bas ))
  printf "\033[7m%s\033[27m%s" "${txt:0:$per}" "${txt:$per:$((wid-per))}"
}

Does it make sense to publish it? I do not know, but you can do the following:

$ curl https://raw.githubusercontent.com/eskerda/barsh/master/barsh.sh | bash

7 lines of bash, freely available under a MIT license :)

https://github.com/eskerda/barsh

on burnout

Big companies, and indeed most big institutions are made by a silent majority of the defeated. […] They found joy elsewhere, and found distance between themselves and their work.

source

bash + fzf quickie for an agile zoom experience

Daily standup, monday 1:1, friday retro, backlog grooming, team meeting. Sound familiar? Go to calendar, find the event, press the zoom link, every day, at least once. Does not sound so agile

Not anymore!

Periodic events usually get the same Zoom room ID every time. Drop in a couple of bash lines, put it somewhere on your path and we get a nifty command to go to zoom rooms without having to fish for links on the screen.

#!/usr/bin/env bash

declare -A rooms

rooms=(
  [standup \(daily\)]="https://zoom.us/j/xxxxxxxxx"
  [1:1 \(mon\)]="https://zoom.us/j/xxxxxxxxx"
  [team meeting \(tue\)]="https://zoom.us/j/xxxxxxxxx"
  [backlock groom \(thu\)]="https://zoom.us/j/xxxxxxxxx"
  [retro \(fri\)]="https://zoom.us/j/xxxxxxxxx"
  [demos]="https://zoom.us/j/xxxxxxxxx"
)

room=$(IFS=$'\n' ; echo -en "${!rooms[*]}" | fzf)
[[ -n $room ]] && open "${rooms[$room]}"

If you ever find yourself on an empty room, go back to step 1, maybe the ID has changed and you are the only one that didn’t get it :)

ゴジラ

  * .    .   *   ___   .    +    .
 .     .   +    /  /  \   .   .
  + .          / /| - - |         *
       *   .   * | - - - |   *   .
   +     .      |---------|   .  +
               _|(O\_ _/O)
             _|/  (__''__)
           _|\/    WVVVVW    ゴジラ!
          \ _\     \MMMM/_
        _|\_\     _ '---; \_
   /\   \ _\/      \_   /   \
  / (    _\/     \   \  |'VVV
 (  '-,._\_.(      'VVV /
  \         /   _) /   _)
   '....--''\__vvv)\__vvv)      ldb

Terrible bash is worse than bash

There’s endless cargo cult about bash being a terrible language and how it should be avoided in favor of go and python for any script longer than N lines. The fact is, no language is going to protect you from being a terrible programmer.

There are many good reasons for using bash where it is suited. There are many good reasons for _not_ using bash where it is not suited.

No matter what the reason is though, there’s no excuse for not using ShellCheck when writing Bash scripts. Every warning and error is clearly documented at https://github.com/koalaman/shellcheck/wiki. It’s an amazing tool, give it a try.

cmdbikes: a terminal client for Citybikes

Lo and behold cmdbikes, a client to get bike share information right at your terminal.

cmdbikes

You can install it by

$ pip install cmdbikes

Looks good, but why?

Most of the time I spend on Citybikes is either working on pybikes or the API but rarely using it, aka eating my own dog food. For a while I thought the API syntax was sufficiently straightforward to not even need an interface for a language. Turns out I was wrong: the v2 syntax of the API has some caveats and having an abstraction over it helps make everything easier and cleaner.

I first noticed this whilst attending an open data Hackatiño organized by Coruña Dixital and GPUL. Even though I was invited to just be part of the jury, being in a room full of people coding made me want to join in on the fun and prompted me to start working on a telegram bot for Citybikes (which I plan to release on the following weeks/months).

It’s impossible to assume an API is going to have a perfect representation, so abstracting it in some way will always hide the ugly parts and will make building API consumers easier. There are already some interfaces for other languages but I haven’t find any for python, most probably due to the fact that requests is an ubiquitous library that makes things much easier.

Precisely for that reason I decided to create python-citybikes, an interface for the Citybikes API that makes working with it a real pleasure. Some things might change so I will keep it under 0.1 for a while.

The cool part of python-citybikes is that it abstracts all code relating to requesting stuff and from the code point of view, all resources are accessed just when they are needed and saved for later reuse (though an update on the data can be forced).

This snippet, for instance, gives you the first station of the first network on the API.

import citybikes

client = citybikes.Client()
# This will do a request to https://api.citybik.es/v2/networks
a_network = next(iter(client.networks))
# This will do a request to https://api.citybik.es/v2/networks/foobar
an_station = next(iter(a_network.stations))
# This will do no further requests
len(client.networks)
# Neither will this
len(an_station.stations)

This one instantiates a network by its id

import citybikes

client = citybikes.Client()
bicing = client.Network(client, uid='bicing')
# This will do a request to https://api.citybik.es/v2/networks/bicing
print(bicing)
# This will not do further requests
len(bicing.stations)

Another good thing of having an interface for an API is that it allows the addition of utility functions. In this case, I added a near function that will return resources based on distance to a given point.

import citybikes

# Gives you 5 nearest stations on a given lat / lng
lat, lng = 40.7831, -73.9712
client = citybikes.Client()
network = next(iter(client.networks.near(lat, lng)))
stations = list(network.stations.near(lat, lng))[:5]

See where this is going? The best way to assert that an interface for an API is useful is by writing a simple terminal client to play with the API, and that’s what cmdbikes is. Even though it would be fairly easy to bundle cmdbikes together with python-citybikes, I have decided against it. This way I get to feel what’s like to install and use it separately.

This is not the first time I think about writing a terminal client for Citybikes. Some years ago I did a live coding exercise on a talk at pycones 2014 precisely about that. Although, since the talk was about pybikes, the exercise used pybikes and not the API directly.

All in all, writing cmdbikes and python-citybikes has been a useful exercise. For a long time I’ve avoided learning the proper way to publish a package on pypi or writing things on python 3.

Turns out writing a proper package and publishing on pypi is not that difficult (at least anymore) and it’s straightforward to write new python 3 code that is compatible with python 2.7 (at least for a simple case like this).

Revisitando BiciMAD

Hace dos años publiqué una “auditoria de seguridad” de BiciMAD. Entrecomillado, porque no era tal. Usando un par de herramientas a disposición de la mayoría salieron errores que no se deberían permitir en ningún proyecto público-privado. Éso era sólo la punta del iceberg, se encontraron más gazapos, hubo amenazas, se escribieron artículos y, como es costumbre, se olvidó todo para dar paso al siguiente escándalo.

De no ser por mi proyecto, Citybikes, yo también me habría olvidado. Para contextualizar, Citybikes es un agregador de sistemas de bicicletas públicas y a día de hoy, es la fuente pública más utilizada para crear desde apps a proyectos de investigación que requieran datos sobre bicicletas públicas.

Ante la duda sobre si incluir BiciMAD al proyecto, mi decisión fue la de no hacerlo hasta que no se ofreciera desde el ayuntamiento o la empresa gestora de una fuente abierta y claramente licenciada de datos (para el que no lo sepa, algo conocido como “open data”).

Bien, han pasado dos años. ¿Ha cambiado algo?

La página de BiciMAD sigue mostrando el siguiente ridículo “mapa-imagen”.


Los datos sobre localización y disponibilidad de las bases (que son los que realmente importan) siguen sin ser públicos. Ésto es un extracto de la propuesta en el portal de datos de Madrid.

Información completa BiciMad (NO VIABLE)
Resumen de la propuesta: “Informacion completa BiciMad ”
Fecha de recepción: 30/09/2015
Propuesto por: ciudadano
Estado:NO VIABLE

Actualmente la aplicación biciMad de gestión del servicio público de bicicleta no dispone, en tiempo real, de la información que se solicita, por lo que actualmente no es viable que dicha información se publique en el portal de Datos abiertos por cuestiones técnicas. Creemos que en el plazo de un año, podríamos disponer, con la colaboración y apoyo de la EMT, de una aplicación más enfocada a la actual política de transparencia en beneficio de todos.
Actualmente, ya se publica en el Portal información sobre la bicicleta pública como la posición (georreferenciada) de las estaciones, las incidencias (SYR), media de bicicletas disponibles diaria u usos diarios, tanto de abonados mensuales como ocasionales y el importe pagado en concepto de indicadores de calidad del servicio.

No obstante, si tenemos previsto a lo largo de la primera quincena del mes de junio, publicar en el Portal de Datos abiertos una mayor información sobre biciMad. Entre esta información estarían los datos completos de los gastos del Ayuntamiento por este servicio.

Recientemente ha llegado una contribución a pybikes (una de las partes fundamentales de Citybikes) que añade el sistema de BiciMAD. Dado que, tras dos años, todavía hay excusas “técnicas” sobre la imposibilidad de abrir ésta fuente, no tengo más remedio que aceptar la contribución. Al menos ahora BiciMAD dispone de una API y un mapa online, aunque sea a través nuestro, y sus usuarios podrán elegir entre la multitud de aplicaciones que ya funcionan con Citybikes.

A disfrutar.

Configuring the Polaroid Cube on Linux (or anywhere)

The Polaroid Cube is all fun and games until you see the only way to configure it is through a program for either Windows or OS X.

Fortunately that configuration program does not do anything fancy, it just edits the files Setting.txt and time.txt that live in the root level of the sdcard. These files are read by the firmware of the camera when powered on, and can be edited by any text editor. The syntax is a bit sloppy.

CUBE-V1.01 
UPDATE:N           <--- Set this field to Y before saving!
        FORMAT     <--- No idea
LightFrequency:1   <--- Europe: 50Hz(1), US: 60Hz(0)
TimeStamp:0        <--- Show a timestamp on the topleft corner of videos (dashcam)
CycleRecord:0      <--- Record a video in loop (dashcam)
BuzzerVolume:0     <--- Set this to 0 for disabling the annoying beep. 1 to 50 if you like it
-------------------------------
LightFrequency
	0 ~ 1, def:0, 0:60Hz  1:50Hz
TimeStamp
	0 ~ 1, def:0, 0:Off   1:On
CycleRecord
	0 ~ 1, def:0, 0:Off   1:On
BuzzerVolume
	0 ~ 50, def:5

Setting.txt

UPDATE:N             <--- Set this field to Y before saving!
 
2014-10-20 00:57:44  <--- Set with current date, YYYY-MM-DD HH:MM:SS  

time.txt

Notice the two dashcam options. Is it an added feature or a hint of the Cube's hardware origin? Even if it is just a glorified dashcam with a sexy underwater case and the Polaroid brand slapped into it, this toy is well worth the buzz: nice concept, fits on the pocket, has a magnet and feels nice on the hand.

Writing a simple QML client for configuring the Polaroid Cube should be simple enough, but I guess it's not really worth the time: Text is the universal interface, maybe another day.

Auditoria de seguridad: BiciMAD

Tras varios años en CityBikes, cada vez que aparece un sistema nuevo de bicicletas realizo un análisis general sobre el funcionamiento de sus sistemas. Qué sorpresa éste lunes cuando llegué a casa y me enteré de que BiciMAD ya está en marcha.

Ubicación de las estaciones

Normalmente, lo primero que hago es consultar si el sistema pone a la disposición un mapa en su página web: http://www.bicimad.com/mapa.html.

Si miramos el código fuente, podemos ver en la línea #158 como no aparecen las estaciones que deberían pintarse en el mapa. Mi única suposición es que varios servicios ya han estado scrapeando la web y desde el ayuntamiento o bonopark se ha decidido atajar el asunto.

var estaciones = [
					
	                  ]; 

Pero qué hay de las aplicaciones móviles? De alguna forma accederán a esos datos… El primer paso será descargarse la aplicación de android de bicimad y usarla. Curiosamente, no se puede usar sin estar dado de alta, pero eso tiene fácil solución. Tendremos que decompilar la aplicación y rastrear strings en búsqueda de algún servidor escondido ;) La navaja suiza en éste caso se compone de: Dex2jar, apktool y jd. No es que tengamos especial interés en el código fuente de la aplicación, sólo en las cadenas de texto que representen urls:

grep -r "http://" .
...
./json/JSONParser.java: public static final String URL_SERVIDOR = "http://xxx.xxx.xxx.xx/bicimadMovil/";
./json/JSONParser.java: public static final String url_all_estaciones = "http://xxx.xxx.xxx.xx/bicimadMovil/functions/get_all_estaciones.php";
./json/JSONParser.java: public static final String url_change_password = "http://xxx.xxx.xxx.xx/bicimadMovil/functions/change_password.php";
./json/JSONParser.java: public static final String url_enviar_push_bienvenida = "http://xxx.xxx.xxx.xx/bicimadMovil/functions/send_push_welcome.php";
./json/JSONParser.java: public static final String url_estaciones_cercanas = "http://xxx.xxx.xxx.xx/bicimadMovil/functions/get_estaciones_cercanas.php";
./json/JSONParser.java: public static final String url_generate_password = "http://xxx.xxx.xxx.xx/bicimadMovil/functions/generate_new_password.php";
./json/JSONParser.java: public static final String url_get_datos_usuario = "http://xxx.xxx.xxx.xx/bicimadMovil/functions/get_datos_usuario.php";
./json/JSONParser.java: public static final String url_get_info_tarjeta_consorcio = "http://xxx.xxx.xxx.xx/bicimadMovil/functions/get_info_tarjeta_consorcio.php";
./json/JSONParser.java: public static final String url_get_ranking_usuarios = "http://xxx.xxx.xxx.xx/bicimadMovil/functions/get_ranking_usuarios.php";
./json/JSONParser.java: public static final String url_get_ruta_usuario = "http://xxx.xxx.xxx.xx/bicimadMovil/functions/get_historial_rutas_usuario.php";
./json/JSONParser.java: public static final String url_get_user = "http://xxx.xxx.xxx.xx/bicimadMovil/functions/get_usuario.php";
./json/JSONParser.java: public static final String url_get_user_by_dni = "http://xxx.xxx.xxx.xx/bicimadMovil/functions/get_usuario_por_dni.php";
./json/JSONParser.java: public static final String url_get_weather = "http://api.openweathermap.org/data/2.5/weather?q=Madrid,Spain";
./json/JSONParser.java: public static final String url_registrar_incidencia = "http://xxx.xxx.xxx.xx/bicimadMovil/functions/registrar_incidencia.php";
./json/JSONParser.java: public static final String url_reservar_base = "http://xxx.xxx.xxx.xx/bicimadMovil/functions/set_base_reservada.php";
./json/JSONParser.java: public static final String url_save_new_user = "http://xxx.xxx.xxx.xx/bicimadMovil/functions/set_new_usuario.php";
./json/JSONParser.java: public static final String url_save_ruta = "http://xxx.xxx.xxx.xx/bicimadMovil/functions/set_ruta_usuario.php";
./json/JSONParser.java: public static final String url_submit_form_alta = "http://xxx.xxx.xxx.xx/bicimadMovil/functions/submit_form_tpv.php";
./json/JSONParser.java: public static final String url_submit_form_alta_tutor = "http://xxx.xxx.xxx.xx/bicimadMovil/functions/submit_form_tpv_tutor.php";
./json/JSONParser.java: public static final String url_submit_form_recarga = "http://xxx.xxx.xxx.xx/bicimadMovil/functions/submit_form_recarga_tpv.php";
./json/JSONParser.java: public static final String url_update_user = "http://xxx.xxx.xxx.xx/bicimadMovil/functions/update_usuario.php";
...

Atiza! Bueno, para empezar tenemos ya un enlace a un feed de datos.

curl http://xxx.xxx.xxx.xx/bicimadMovil/functions/get_all_estaciones.php | json_pp
{
   "success" : 1,
   "estaciones" : [
      {
         "porcentaje" : 62.5,
         "latitud" : "40.4168961",
         "longitud" : "-3.7024255",
         "numero_bases" : "24",
         "libres" : "15",
         "luz" : "0",
         "idestacion" : "1a",
         "activo" : "1",
         "numero_estacion" : "1a",
         "nombre" : "Puerta del Sol",
         "direccion" : "Puerta del Sol No 1"
      },
      {
         "porcentaje" : 45.833333333333,
         "latitud" : "40.4170009",
         "longitud" : "-3.7024207",
         "numero_bases" : "24",
         "libres" : "11",
         "luz" : "0",
         "idestacion" : "1b",
         "activo" : "1",
         "numero_estacion" : "1b",
         "nombre" : "Puerta del Sol",
         "direccion" : "Puerta del Sol No 1"
      },
      {
         "porcentaje" : 54.166666666667,
         "latitud" : "40.4205886",
         "longitud" : "-3.7058415",
         "numero_bases" : "24",
         "libres" : "13",
         "luz" : "0",
         "idestacion" : "2",
         "activo" : "1",
         "numero_estacion" : "2",
         "nombre" : "Miguel Moya",
         "direccion" : "Miguel Moya No 1"
      },
      {
         "porcentaje" : 22.222222222222,
         "latitud" : "40.4302937",
         "longitud" : "-3.7069171",
         "numero_bases" : "18",
         "libres" : "4",
         "luz" : "0",
         "idestacion" : "3",
         "activo" : "1",
         "numero_estacion" : "3",
         "nombre" : "Conde Suchil",
         "direccion" : " Plaza Conde Suchil No 2-4"
      },
      ...
   ]
}

Pero aún hay más, sin tan siquiera querer mirar urls tan jugosas como get_usuario_por_dni, el uso de http (no cifrado) para registrarse y hacer login desde la aplicación o analizar a fondo JSONParser nos encontramos con las siguientes joyas:

bicimad
key

Es eso que veo ahí una clave RSA privada para enviar notificaciones push a los dispositivos? Para los legos en materia, suponiendo que la clave esté en uso se podría, por ejemplo, enviar publicidad de parte de BiciMAD a todas las personas con la aplicación instalada. Es decir, suplantar la identidad de BiciMAD. Sin nombrar el resto de scripts de administración que tienen públicos en el listing, PRUEBA.php, etc. Llegados a éste punto decido dejar de hurgar en el bote de gusanos antes de ensuciarme demasiado. Ésto es sólo la punta del iceberg.

Un proyecto enmarcado en el Lote 5 de la contratación de gestión de los servicios públicos de Madrid de 884 millones de euros en los próximos 12 años, con licitación a Bonopark S.L. de 25 millones de euros en 10 años… no lo tengo muy claro.

Me gustaria añadir cómo lo ocurrido aquí defiende la tesis sostenida por CityBikes:

  1. Los datos deben ser abiertos. Más aún cuando el proyecto es público.
  2. Los datos deben ser propiedad del ayuntamiento y nunca de la empresa gestora. Ésta “cláusula” permite al ayuntamiento desarrollar libremente aplicaciones móviles sin depender de la empresa gestora o como me gusta llamarlo, sin que la empresa gestora secuestre los datos.
  3. Los datos son más importantes que las aplicaciones móviles: con datos se pueden fabricar aplicaciones, con las aplicaciones no se fabrica nada (excepto en algunos casos frustraciones).

Recomiendo encarecidamente al ayuntamiento de Madrid seguir los pasos de otros ayuntamientos en política de apertura de datos, como Londres o Barcelona. También al gobierno de España inspirarse en la política de datos abiertos de Francia y su licencia de datos abiertos Open Data Licence que recientemente obligó a JCDecaux a proporcionar una API pública.

En general, la misión de CityBikes pasaría por incorporar éstos datos en nuestras fuentes y ponerlos a la disposición del público de forma libre ya sea para consumirlo desde aplicaciones de terceros como para poder montar proyectos relacionados. Ésta vez, no voy a incluir los datos de BiciMAD en CityBikes ni pybikes hasta que los problemas en sus sistemas informáticos estén “resueltos” y se provea, desde BiciMAD o el ayuntamiento de Madrid, de un feed de estaciones correctamente licenciado, tal como se nos vende desde el gobierno central: http://datos.gob.es/.

Categorizing data feeds at CityBikes

Heads up for a boring, but needed, post on categorization. CityBikes (API) aggregates to date 176 data sources of different bike sharing systems. One of the main efforts of this project is keeping everything in order to avoid duplicating implementation of feeds that share the same (or at least similar) syntax. In order to understand how to add a new city to the project it’s necessary to know the categorization of feeds inside CityBikes. Let’s make some analysis to be able to name the feeds for what they are.
(more…)

A conky config for thinkpads

Lately I was feeling a bit nostalgic about how the desktop looked when I started playing with linux, and decided that it was time to write myself a Conky config to pimp my laptop.

thinky

Much of the stuff could have been done using the Lua and Cairo API from Conky, but I played it off with just a bash script and iconic fontsets.

thinky

The cool thing about it is that some icons change depending on the state. For instance, the battery icon displays the charge level, and blinks if the charge level < 5%.

Other features include:

  • An indicator for your ThinkLight™
  • Battery status
  • Volume and brightness controls
  • CPU and Memory usage
  • Disk usage
  • Network usage
  • CapsLk indicator

The light indicator, brightness and volume come from the ibm acpi module, thus some changes may be needed to make it work without it.

Installation

git clone https://github.com/eskerda/thinky.git ~/.thinky
cp ~/.thinky/fonts/*.ttf ~/.fonts
conky -c ~/.thinky/conkyrc

Credits

The main font is OswaldFont by Vernon Adams, and the icons provided in the thinky-glyphs.ttf file are part of the following iconic fontsets: Font Awesome, Typicons, Entypo; repackaged into a single file using Fontello.

Dungeon generation using BSP trees

Essentially, a binary space partition algorithm will recursively divide a surface into two for a number of iterations. A binary tree provides the most obvious data structure to traverse the different levels of partitions.

For partitioning, in each iteration the direction of the division -horizontal or vertical- is assigned randomly and so is the size of the first partition, while the second just takes the remaining of the space. Later, on the leafs of the tree (down-most nodes), rooms can be grown within the container, be it randomly or by assigning some constraints that suit the generation. Finally, by connecting the center of each one of the partitions with his brother, all the partitions get connected and accessible.

bsp-dungeon-generation

Maybe it’s a good idea to check the interactive demo of the code that comes ahead before starting. To increase the number of iterations make sure to increase the map size accordingly.

Let’s get into it. First we need a toy implementation of a binary tree. Do not consider the following feature proof or efficient code-wise.

var Tree = function( leaf ) {
    this.leaf = leaf
    this.lchild = undefined
    this.rchild = undefined
}

That’s it. Well, we might sooner or later need some auxiliary functions to get an specific level of the tree and to get the down-most bottom leafs of it, be it for debugging or just for the exercise.

Tree.prototype.getLeafs = function() {
    if (this.lchild === undefined && this.rchild === undefined)
        return [this.leaf]
    else
        return [].concat(this.lchild.getLeafs(), this.rchild.getLeafs())
}

Tree.prototype.getLevel = function(level, queue) {
    if (queue === undefined)
        queue = []
    if (level == 1) {
        queue.push(this)
    } else {
        if (this.lchild !== undefined)
            this.lchild.getLevel(level-1, queue)
        if (this.rchild !== undefined)
            this.rchild.getLevel(level-1, queue)
    }
    return queue
}

Tree.prototype.paint = function(c) {
    this.leaf.paint(c)
    if (this.lchild !== undefined)
        this.lchild.paint(c)
    if (this.rchild !== undefined)
        this.rchild.paint(c)
}

This should be enough to keep things forward. Again, an array mapped tree would avoid us some unnecessary recursive steps, but this is a demo, right?

Now, some utils that will come handy

var Point = function(x, y) {
    this.x = x
    this.y = y
}

function random(min, max) {
    return Math.floor(Math.random() * (max - min + 1) + min)
}

Next thing we need a container prototype. Easy as pie:

var Container = function(x, y, w, h) {
    this.x = x
    this.y = y
    this.w = w
    this.h = h
    this.center = new Point(
        this.x + (this.w/2),
        this.y + (this.h/2)
    )
}

Container.prototype.paint = function(c) {
    c.strokeStyle = "#0F0"
    c.lineWidth   = 2
    c.strokeRect(this.x * SQUARE, this.y * SQUARE,
                 this.w * SQUARE, this.h * SQUARE)
}

Okay, let’s build this tree. We need a function that grows a binary tree of containers.

function split_container(container, iter) {
    var root = new Tree(container)
    if (iter != 0) {
        var sr = random_split(container)
        root.lchild = split_container(sr[0], iter-1)
        root.rchild = split_container(sr[1], iter-1)
    }
    return root
}

And now the actual function that splits a container

function random_split(container) {
    var r1, r2
    if (random(0, 1) == 0) {
        // Vertical
        r1 = new Container(
            container.x, container.y,             // r1.x, r1.y
            random(1, container.w), container.h   // r1.w, r1.h
        )
        r2 = new Container(
            container.x + r1.w, container.y,      // r2.x, r2.y
            container.w - r1.w, container.h       // r2.w, r2.h
        )
    } else {
        // Horizontal
        r1 = new Container(
            container.x, container.y,             // r1.x, r1.y
            container.w, random(1, container.h)   // r1.w, r1.h
        )
        r2 = new Container(
            container.x, container.y + r1.h,      // r2.x, r2.y
            container.w, container.h - r1.h       // r2.w, r2.h
        )
    }
    return [r1, r2]
}

Good, now let’s throw it into a canvas! The wording here might look a bit weird, just assume we are entering this in a development console.

var canvas       = document.getElementById('viewport')
var MAP_SIZE     = 50
var SQUARE       = canvas.width / MAP_SIZE
var N_ITERATIONS = 4

var c_context = canvas.getContext('2d')

var main_container = new Container(0, 0, canvas.width, canvas.height)
var container_tree = split_container(main_container, N_ITERATIONS)

c_context.fillStyle = "#000"
c_context.fillRect(0, 0, canvas.width, canvas.height)
container_tree.paint(c_context)

BSP gone wild
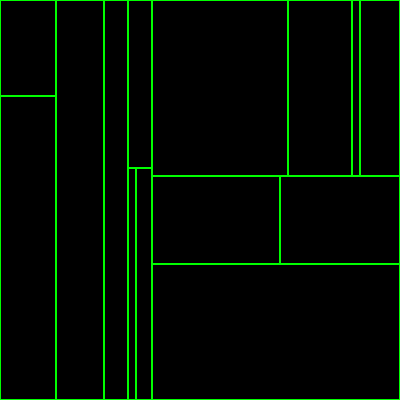
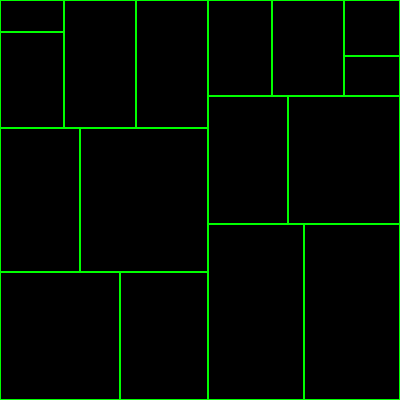
Woosh, not much impressive, this barely resembles a Piet Mondrian scam.

The ugly bits

Randomness it’s all good and fun, until you find out that containers sized too small or too large will result in weird looking results, so here I am discarding any container with a horizontal or vertical ratio smaller than a predefined one. Too aggressive ratios will follow with growing the stack size out of the heap limit.

I do not know if this is the best solution, or if I should not worry about too small partitions, or for instance if I could generate the random width or height with a minimum value (though, I do not like that, as it makes the algorithm code as straightforward. If we define a minimum of 3 squares, what happens when you are confronted by an hypothetical partition of 4 squares?).

function random_split(container) {
    var r1, r2
    if (random(0, 1) == 0) {
        // Vertical
        r1 = new Container(
            container.x, container.y,             // r1.x, r1.y
            random(1, container.w), container.h   // r1.w, r1.h
        )
        r2 = new Container(
            container.x + r1.w, container.y,      // r2.x, r2.y
            container.w - r1.w, container.h       // r2.w, r2.h
        )

        if (DISCARD_BY_RATIO) {
            var r1_w_ratio = r1.w / r1.h
            var r2_w_ratio = r2.w / r2.h
            if (r1_w_ratio < W_RATIO || r2_w_ratio < W_RATIO) {
                return random_split(container)
            }
        }
    } else {
        // Horizontal
        r1 = new Container(
            container.x, container.y,             // r1.x, r1.y
            container.w, random(1, container.h)   // r1.w, r1.h
        )
        r2 = new Container(
            container.x, container.y + r1.h,      // r2.x, r2.y
            container.w, container.h - r1.h       // r2.w, r2.h
        )

        if (DISCARD_BY_RATIO) {
            var r1_h_ratio = r1.h / r1.w
            var r2_h_ratio = r2.h / r2.w
            if (r1_h_ratio < H_RATIO || r2_h_ratio < H_RATIO) {
                return random_split(container)
            }
        }
    }
    return [r1, r2]
}

Ok, run again!

var canvas           = document.getElementById('viewport')
var MAP_SIZE         = 50
var SQUARE           = canvas.width / MAP_SIZE
var N_ITERATIONS     = 4
var DISCARD_BY_RATIO = true
var H_RATIO          = 0.45
var W_RATIO          = 0.45

var c_context = canvas.getContext('2d')

var main_container = new Container(0, 0, canvas.width, canvas.height)
var container_tree = split_container(main_container, N_ITERATIONS)

c_context.fillStyle = "#000"
c_context.fillRect(0, 0, canvas.width, canvas.height)
container_tree.paint(c_context)

BSP with filter ratios
Much more pleasing to the eye. It’s true that a pattern-like structure can be seen and by discarding small results epic randomness is also being discarded, with the possibility to delete rooms that are too small or impossible (hence, resulting in one less room in the map). In any case, the option of discarding is left open, and the results wielded are much more intelligible just for this post.

At the start I was looking after a city-like partition. To see if BSP will yield me what I was looking after, I did set the recursion level to 9 with a map size of 500 squares. The results resemble what I want, and give me enough material to move to the next stage.

Massive BSP

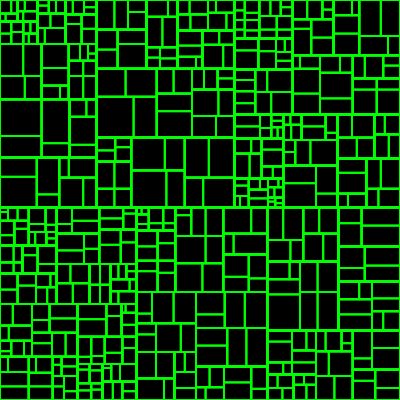
Into the rooms and paths

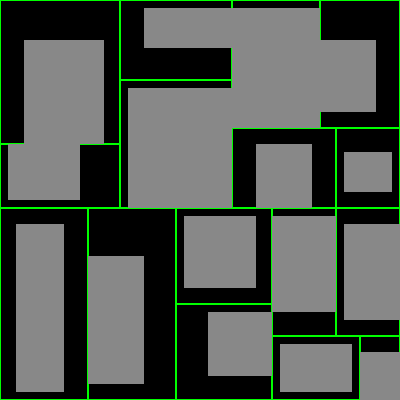
For the purpose of my generator both rooms and paths are a bit out of the scope as it is not exactly what I am looking for yet. However, I will include them for the sake of completeness, so inaccuracies should be expected.

As mentioned earlier in the post, when we are happy with a recursion level, rooms are placed within each container. The sizing on the room can be defined by any rules. In this example, rooms are grown with a random padding ranging from 0 to a third of the room size (for each of the sides). By allowing it to be 0, the possibility of touching rooms is contemplated, which should give interesting results.

var Room = function( container ) {
    this.x = container.x + random(0, Math.floor(container.w/3))
    this.y = container.y + random(0, Math.floor(container.h/3))
    this.w = container.w - (this.x - container.x)
    this.h = container.h - (this.y - container.y)
    this.w -= random(0, this.w/3)
    this.h -= random(0, this.w/3)
    return this
}
Room.prototype.paint = function(c) {
    c.fillStyle = "#888"
    c.fillRect(this.x * SQUARE, this.y * SQUARE,
               this.w * SQUARE, this.h * SQUARE)
}

Using the helper function to get the leafs of the tree rooms are created dependent of each one of them and later its paint function is called.

var canvas           = document.getElementById('viewport')
var MAP_SIZE         = 50
var SQUARE           = canvas.width / MAP_SIZE
var N_ITERATIONS     = 4
var DISCARD_BY_RATIO = true
var H_RATIO          = 0.45
var W_RATIO          = 0.45

var c_context = canvas.getContext('2d')

var main_container = new Container(0, 0, canvas.width, canvas.height)
var container_tree = split_container(main_container, N_ITERATIONS)

c_context.fillStyle = "#000"
c_context.fillRect(0, 0, canvas.width, canvas.height)
container_tree.paint(c_context)
var leafs = container_tree.getLeafs()
for (var i = 0; i < leafs.length; i++) {
    new Room(leafs[i]).paint(c_context)
}

BSP with rooms

Sweet. Now let’s add a way for paths to be drawn on the canvas. Again, the purpose of this demo is just on drawing the stuff, so we are not going to save them in any structure, nor carve it into a tile map. Let’s see what happens if we draw a line between the centers of containers with the same parent.

Container.prototype.drawPath = function(ctx, container) {
    ctx.beginPath()
    ctx.lineWidth = SQUARE
    c.strokeStyle = "#888"
    c.moveTo(this.center.x * SQUARE, this.center.y * SQUARE)
    c.lineTo(container.center.x * SQUARE, container.center.y * SQUARE)
    c.stroke()
}
var draw_paths = function(ctx, tree) {
    if (tree.lchild == undefined || tree.rchild == undefined)
        return
    tree.lchild.leaf.drawPath(ctx, tree.rchild.leaf)
    draw_paths(ctx, tree.lchild)
    draw_paths(ctx, tree.rchild)
}

var canvas           = document.getElementById('viewport')
var MAP_SIZE         = 50
var SQUARE           = canvas.width / MAP_SIZE
var N_ITERATIONS     = 4
var DISCARD_BY_RATIO = true
var H_RATIO          = 0.45
var W_RATIO          = 0.45

var c_context = canvas.getContext('2d')

var main_container = new Container(0, 0, canvas.width, canvas.height)
var container_tree = split_container(main_container, N_ITERATIONS)

c_context.fillStyle = "#000"
c_context.fillRect(0, 0, canvas.width, canvas.height)
container_tree.paint(c_context)
draw_paths(c_context, container_tree)
var leafs = container_tree.getLeafs()
for (var i = 0; i < leafs.length; i++) {
    new Room(leafs[i]).paint(c_context)
}

BSP, rooms and paths

Good as done. Now, what about some cleaning up?

var Map = function(canvas) {
    this.width  = canvas.width
    this.height = canvas.height
    this.ctx    = canvas.getContext('2d')
    this.c_tree = undefined
    this.rooms  = []
}

Map.prototype.init = function() {
    var m_container = new Container(0, 0, MAP_SIZE, MAP_SIZE)
    this.c_tree = split_room(m_container, N_ITERATIONS)
    this.growRooms()
}

Map.prototype.growRooms = function() {
    var leafs = this.c_tree.getLeafs()
    for (var i = 0; i < leafs.length; i++)
        this.rooms.push(new Room(leafs[i]))
}

Map.prototype.clear = function() {
    this.ctx.fillStyle = "#000"
    this.ctx.fillRect(0, 0, this.width, this.height)
}

Map.prototype.drawGrid = function() {
    this.ctx.beginPath()
    this.ctx.strokeStyle = "rgba(255,255,255,0.4)"
    this.ctx.lineWidth = 0.5
    for (var i = 0; i < MAP_SIZE; i++) {
        this.ctx.moveTo(i * SQUARE, 0)
        this.ctx.lineTo(i * SQUARE, MAP_SIZE * SQUARE)
        this.ctx.moveTo(0, i * SQUARE)
        this.ctx.lineTo(MAP_SIZE * SQUARE, i * SQUARE)
    }
    this.ctx.stroke()
}

Map.prototype.drawContainers = function() {
    this.c_tree.paint(this.ctx)
}

Map.prototype.drawRooms = function() {
    for (var i = 0; i < this.rooms.length; i++)
        this.rooms[i].paint(this.ctx)
}

Map.prototype.drawPaths = function(tree) {
   if (tree.lchild == undefined || tree.rchild == undefined)
        return
    tree.lchild.leaf.drawPath(this.ctx, tree.rchild.leaf)
    this.draw_paths(tree.lchild)
    this.draw_paths(tree.rchild)
}

Map.prototype.paint = function() {
    this.clear()
    this.drawGrid()
    this.drawContainers()
    this.drawRooms()
    this.drawPaths()
}

Which now can be run as

var map = new Map(document.getElementById('viewport'))
map.init()
map.paint()

bsp-dungeon-generation-random

Feel free to check the playground demo at /demos/dungeon.

EDIT: Some years after, I rewrote most of the code from this post, maybe it’s useful /demos/pizza.

The mule at the Blue Systems sprint

A Mule

At the last Blue Systems sprint in Pineda I found a mule roaring outside the house. I love how friendly these animals are. In particular, this one followed me through the fence while walking up the hill, and when I was out of my bike to snap a picture, decided to take his head off the fence. I can only assume this is his preferred spot to creep and get food from strangers.

Fun with the Arduino UNO and a NES gamepad

A while ago I wanted to play the original NES. It turned out my console was broken and so, decided to find a way to connect the NES gamepad to the computer using an Arduino.

I looked on the Internet and found many things, but not exactly what I wanted:

What I found

  • Read the NES gamepad from an Arduino
  • Emulate a keyboard on the computer, and interpret Arduino serial input as keyboard presses.
  • How to build USB firmwares for AVR microcontrollers. How to build an USB firmware for AVR that acts as a gamepad.

What I wanted

  • A NES gamepad that showed on the computer as an USB game HID: something you can plug into any computer / console and will (hopefully) work out of the box, plug and play.

So, all the pieces for the puzzle were there, and the only thing left was to put them together. Now that it’s working as I intended to I have decided to write this post to save some time to anyone interested in building similar things. This post might be too verbose for the purpose of this thing, but what’s the fun on putting something together you can barely understand? I decided to spend more time than usual inspecting all the things involved on the process.

Note that these are not the instructions on how to do it, but a mix up of story, missing gaps of information I found, or at least some useful information to lower the entrance barrier a bit, and some reference links. For instructions check the repository.

TL;DR: I put together a USB HID gamepad with the NES controller and an Arduino.  Also, first post.

P1011229_t

Onto the NES Gamepad

The NES gamepad has a 8-bit shift register that, upon receiving a LATCH saves the state of the 8 buttons (GND means pressed). Clocking a signal through the CLK line, the state byte is shifted through the DATA pin.

    NES gamepad controller pinout

        o 4    1. +5VDC Supply                            INPUT
    1 o o 5    2. ?
    2 o o 6    3. ?                                 _|_|_|_|_|_|_|_|_
    3 o o 7    4. GND                   LATCH  ____|                 |
               5. CLK                              |     IC 4021     |
               6. LATCH                   CLK  ____|\                |----- DATA
               7. DATA                             |/                |
                                                   |_________________|
           ________
    LATCH |        |
    ______|        |______________________________________________________________________________

                     ____      ____      ____      ____      ____      ____      ____      ____ 
    CLK             |    |    |    |    |    |    |    |    |    |    |    |    |    |    |    |
    ________________|    |____|    |____|    |____|    |____|    |____|    |____|    |____|    |__

         _  ________  ________  ________  ________  ________  ________  ________  ________  ______
    DATA  \/    A   \/    B   \/ Select \/  Start \/   Up   \/  Down  \/  Left  \/  Right \/
         _/\________/\________/\________/\________/\________/\________/\________/\________/\______
                     |--12µs--|

A diagram on extracting the input from a NES gamepad. Some pins on the IC 4021 omitted for clarity.

The following code outputs the input from a NES gamepad in binary words.

int CLK = 2;
int LATCH = 3;
int DATA = 4;

byte last_read = 0xFF;

void setup();
void loop();

void setup()
{
    Serial.begin(115200);
    pinMode(CLK, OUTPUT);
    pinMode(LATCH, OUTPUT);
    pinMode(DATA, INPUT);
}

void loop()
{
    byte reading = read_NESpad();
    if (reading != last_read){
         Serial.println(reading, BIN);
    }
    last_read = reading;
}

byte read_NESpad() {
      /*
        NES Word Mapping
        x x x x x x x x
        | | | | | | | |_  A
        | | | | | | |___  B
        | | | | | |_____  SELECT
        | | | | |_______  START
        | | | |_________  UP
        | | |___________  DOWN
        | |_____________  LEFT
        |_______________  RIGHT
     */

  // Send a HIGH pulse to latch. Make 8 shift register store state
  // of all buttons
  digitalWrite(LATCH, HIGH);
  delayMicroseconds(12);
  digitalWrite(LATCH, LOW);

  // Clock the 8 shift register to get the
  // state of the buttons
  byte output = 0x00;
  for (int i = 0; i < 8; i++){
      output |= digitalRead(DATA) << i;
      digitalWrite(CLK, HIGH);
      delayMicroseconds(6);
      digitalWrite(CLK, LOW);
      delayMicroseconds(6);
  }
  return output;
}

This was enough to build a minimum viable hack, consisting on an arduino sketch reading the gamepad and sending it through the serial interface and a Node.js (\o/) server reading it and firing xdotool to emulate key presses. Ugly, but enough for a hit of nostalgia for the rest of the weekend (if you really want to see, it lives on this branch). With this I was on the same as most of the links I found googling around.

After playing with it for a while I sort of felt this was well behind my initial goal. Which I initially wanted was to actually build an USB gamepad you could plug onto your friends’ computers, no install, no anything. Upon researching, I found out that meant flashing a new firmware to the UNO, even if I did not really understand what that meant.

A little guide on Arduino and DFU

Instead of using an specific purpose USB-to-serial chip, the Arduino comes with an ATmega programmed to act as an USB to serial device (so you can upload compiled bytecode from sketches into the EEPROM). That’s what gets detected when you connect the Arduino into the computer. In better words:

The Uno differs from all preceding boards in that it does not use the FTDI USB-to-serial driver chip. Instead, it features the Atmega16U2 (Atmega8U2 up to version R2) programmed as a USB-to-serial converter.
http://arduino.cc/en/Main/arduinoBoardUno

    ____________________
   | o       ···········
RESET ---> + · ·
GND -----> + · ·
  _|____
 |      |
 | USB  |
 |______|
   |
   |

In order for the Arduino UNO to appear (and act) as a different device, a new firmware has to be flashed into the ATmega16U2, by putting it into DFU (direct firmware upgrade) mode which, depending on the board, is done with more or less messy ways which for older versions may require soldering.

Hopefully my board is an R3, which can be cleanly put into DFU mode by jumping the RESET and GND pins on the Atmega16U2 together for a fraction, using a jumper or, if feeling wild, just a piece of copper.

Looking for inspiration

At this point, I did not really know what to do. I could read the NES gamepad from the Arduino using sketches, and was able to flash new firmwares onto the arduino, next step?

LUFA

LUFA (Lightweight USB Framework for AVRs, formerly known as MyUSB) is an open-source complete USB stack for the USB-enabled Atmel AVR8 and (some of the) AVR32 microcontroller series, released under the permissive MIT License (see documentation or project source for full license details). The complete line of Atmel USB AVRs and USB AVR boards are supported by the library, as are any custom user boards, via custom board hardware drivers supplied by the user.
http://www.fourwalledcubicle.com/LUFA.php

Darran Hunt’s Arduino Hacking blog has a nice set of posts with examples on how to build different HID devices using LUFA and Arduino. In particular, there’s one example that emulates an USB joystick with two axis and two buttons, which is almost what I needed. The example is, at the same time, based on one example from the LUFA library, and Arduino’s USB-to-Serial firmware.

HID Devices interact with the USB stack using HID reports. The firmware describes itself as an USB HID Joystick and reads on the serial interface from the main processor (the ATmega328), which means it can read data from the main code (sketch, running on the ATmega328) to the firmware code (running on the ATmega16U2). The sketch handles all the input, and sends it through the serial interface using a packed struct. The firmware just roams there, waiting for data, and then sends it to the USB stack as a proper HID report.

I found Darran’s design on this issue pretty clever and on the line of what Arduino is supposed to feel like. The firmware is doing all the heavy lifting, and all the logic lives on the sketch.

Note that there was no real need to compile a modified version of the firmware. I could be ok by using one example that has 40 buttons, and throttles and more axis. But when I get into something, I really want to understand how all the parts work together. If not, it’s almost time wasted.

HID report descriptors 101

For the USB stack to know what device is it talking to, and how this reports do look like, it uses a descriptor table. In this descriptor table you fill up everything about your device: what’s its purpose, what type of device is it, how many inputs it has and how are they represented. Oh, and it has to be 8 byte aligned, which means adding a padding every time you are sending less than a byte. Everything is documented on the USB HID Specification document (have fun with it).

Some reference links: [wikipedia] [USnooBie’s USB HID Report Descriptor Tutorial 1]

2 Axis
Min Max Value (-100, 100)
2^3 = 8 (size, signed integer), #2 (axis)
4 Buttons
size 1 (boolean), # 4
+ 4bits of padding.

Device and manufacturer ID

Devices identify themselves using a device and manufacturer ID. For acquiring one yourself you would have to pay large sums of money to the USB foundation. I have decided to leave the original Atmel Corp. LUFA Joystick Demo Application.

The whole thing

P1011227_t

Hacking a firmware yourself

You’ll need to:

  • Set up the LUFA environment
  • Read these posts in Darran’s blog, just for reference.
  • Take an example from the LUFA library that suits what you want.
  • Look into arduino’s usb-serial original firmware.
  • Combine them both to interface with the Arduino.
  • Write your HID Descriptor
  • Start hacking.

Chicken and egg

At this point, I assume I could be doing all the ‘nintendo’ parsing part on the firmware, be it by directly interfacing with the INPUT ports or just getting the 8 bits through the serial interface instead of the whole HID Report, but that would make it too specific. Having just a firmware that does one thing, and does it well just keeps everything simpler.

But being that Arduino is meant for easy hacking into microcontrollers, that would not make much sense, and I would be better by just glueing an atmel microcontroller into a NES Gamepad.

Conclusions

After this I would love to put together a project to ease the creation of USB game devices, just by using the arduino library, similar to unojoy. While describing a 30 button – 6 axis – 1 hat switch device could be enough to have a generic firmware, I want my devices to appear on the computer exactly as they are. What I think of would be some compilation variables or a descriptor generator, and then a different protocol of communication between the sketch and the firmware.

Also, I cannot wait to get more gamepads of consoles I did not have, like the SNES and the N64.

Finally, it will be interesting to put two gamepads together on the same board and make them appear as two devices by using report ids on the HID descriptor.